
So the end is near and we are all prepping for the end of the world. Most of us have food stacked away, weapons and other essential items awaiting the end of days. But what happens when you run out of ammo and gun powder? Or what about when you run out of bullets? Well no need to fear mother nature has got us covered. We can make bow and arrows and traps to trap animals, all provided to us by mother nature. Also in my honest opinion bow and arrows are better than guns and bullets because arrows are easy to make and plentiful also it is very quite and deadly ( you can add poison to the arrow head). Now must people who read this blog know two things a. I love books ( because I can keep them around long after computers die) and 2. I love amazon because of their cheap book and other supplies. Alright so lets get started so first I want to recommend a few book on making traps and bow and arrows.


Now for some website sources and how to do all of this. Now personally I still recommend the book because they will last longer then the internet and you can reference back to them when the internet is shut down.
Once considered as a weapon of choice for everyone, from the Native Americans to the Mughal armies, a bow has been an elegant weapon that has served mankind since ages. Cupid, the God of love, and the legendary hero Robin Hood, have also used a bow and arrow. On the lighter side, it could be handy, when one is lost on an island or in a forest. This is the easiest weapon to make for self-protection and hunting. Archery, which is played by shooting arrows with a bow, is an Olympic sport.
The best wood to make a bow is deadwood. However, bows can be made from oak, yew, teak, elm, hickory, black locust and hazel depending on their availability. Bows should be built as high as the height of the user to give the best results. Whatever wood is used, make sure that it is an inch thick in diameter, about 5 to 6 feet long, and is easily bendable. For arrows, the wood can be half an inch thick, and about 1 to 2 feet long.
**Click on the diagrams to enlarge
 | After selecting the wood, cut off the top of the stick with a knife. (drawing on the left) Shape the bow wide at the center and narrow and flexible at the ends. (drawing on the left) Whittling the entire length of the bow including the branches is very important. Cut two notches with the help of a knife at about 1 or 2 inches from both the ends of the bow. The notch should be deep and should go about halfway through the diameter. It should be cut at a 90 degree angle, on the side of the bow which arches outward. These notches are important as they hold the bowstring together and are called the bow necks. (drawing on the left/right) A variety of material can be used for the bowstring. These include: rawhide, thin nylon, cotton strands, hemp cord, vines, and sinew. These strings need not be stretchable, as the power comes from the bow itself. Shorter the length of the string, stronger the bow. (drawing on the right) First, make a loop at one notch, then using your foot as leverage, force a gentle curve and secure the second notch at the other end. The bow is now ready. (drawing on the right) |  |
| Choose straight sticks for making the arrows. The best wood for making arrows is black locust, elm, or oak. (drawing on the left/right) The diameter of the arrow stick should be about half an inch, and the length should be half that of the bow. (drawing on the left/right) Shape the arrow by whittling the wood, but remember not to make notches at both the ends. Instead, make only one notch at the end of the arrow, where the bowstring will sit, when pulled through the bow. (drawing on the right) Carve out arrowheads at the front of the arrow. If the arrows are made at home, and not in a jungle, arrowheads from metal, stone or glass can also be made.(drawing on the left) To provide more balance and accuracy, some feathers can be added to the end of the arrow stick. These can be made from cardboard papers by cutting into triangles and attaching to the tail of the arrow. Keeping them evenly spaced will give the arrow a spin, when released. (drawing on the right) |
A lot of care and patience should be taken while making bows and arrows so that it has the right balance. Making a bow and arrow can be a creative activity for older children and adults. But extreme care should be taken, while using the bow and arrows. When handled negligently, it could lead to injury and possibly death. Although, many types of modern bows and arrows are available in the market today, nothing is more satisfying than making one yourself.
The most time-consuming task of making bow and arrows is the whittling of wood. If proper whittling isn't done, it won't be effective to use. When the bows and arrows are ready, they can be tried out in the woods. However, one should remember that the accuracy of these weapons are only as good as ones aim or shooting skills.
(source: http://www.buzzle.com/articles/how-to-make-wooden-bow-and-arrows.html )
Snares and Traps are designed to choke, crush, hang, orentangle the animals that you’re trying to catch.
The best traps are usually very simple to make and should be placed in multiple locations. When using traps and snares, numbers are very important. The more traps you place, the better your chances are of catching something. It’s also a good idea to use a variety of traps. I’ve found that certain traps sometimes work better depending on your location.
Here are a few of the most common types of traps and snares used in a survival situation.
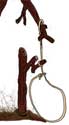
A SIMPLE SNARE

The Simple Snare is made from a noose. The snare is placed over a trail or den hole and attached to a stake. This type of snare can also be placed on known game trail with small twigs to keep it in place.
Make sure that the noose is large enough to allow the animals head to pass through it. As the animal moves through the snare it should tighten around its neck. The more the animal struggles to get lose the tighter the snare will get. Snares usually do not kill the animal, so make sure you use wire that is strong enough to keep the animal in place until you return to the trap.
BAITING A TRAP
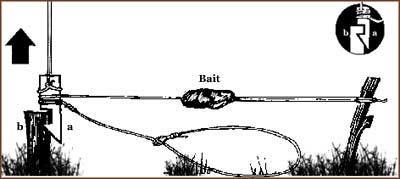
Baiting a trap or snare will help you improve your chances of catching something to eat! Unlike a normal snare, a baited snare can actually help you draw animals in towards the trap. Make sure that the bait is something the animal is familiar with, but not something that is so widely available in the surrounding area.
THE FIGURE-FOUR DEAD FALL
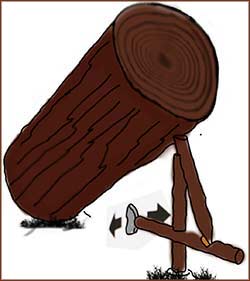
The Figure-four dead fall is gets it’s name from the number of shapes that make up this trap. The Figure-four uses a trigger to drop a heavy object onto an animal. The object should be heavy enough to kill the animal on impact.
DEAD FALL PIT
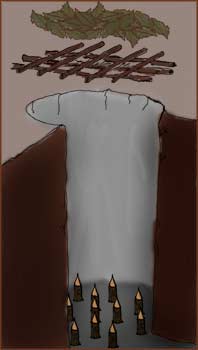
If you are stranded for a long period of time without a gun or other means of hunting, then a dead fall pit is a great way of catching larger animals. While, this dead fall pit is a good way to catch larger animals, keep in mind that it will take a lot of time and energy to build. Make sure you have a good supply of food before building a trap like this.
- First look for a game trail.
- Then start to dig your pit near the trail.
- When it is deep enough to hold the intended animal, place sharpened sticks in the bottom that point up.
- When your pit is finished put together a grill of long branches and then cover them with leaves and grass.
- Place them over the pit
A word of warning
 These traps are for informational purposes only, they are extremely dangerous, and some of them can be lethal. In some parts of the country using them is also illegal. You should never use traps or snares unless you are in a true survival situation.
I hope you enjoyed these how tos and a few suggestions. I will be updating some news information as well, about how the world is doing. We are calling it world watch posting and reporting breaking news from all over the world so you have an idea about what is going on out there, because as I say knowledge is power and knowing what is going on around the world is just as important as prepping. So as usual feel free to leave comments, questions, or anything really all feedback is welcome and also share some of your knowledge.
No comments:
Post a Comment